Halloween DIY: Thing 1 & Thing 2 Costume
XO Lauren
Thing 1 & Thing 2 Costume

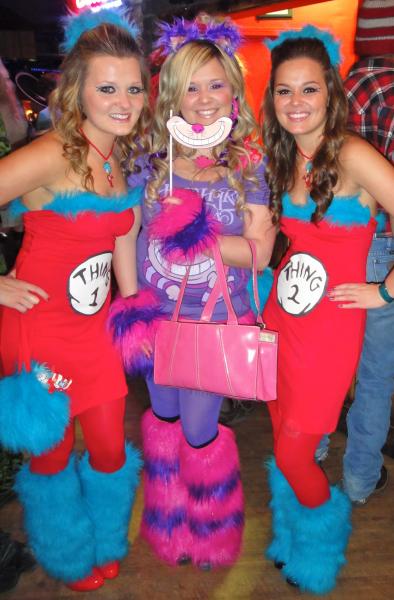
Hey everyone, it’s Megan! My sister, Lisa, and I LOVE Halloween–and we love making our own costumes each year! We are big fans of Cat in the Hat, so we chose to be Thing 1 and Thing 2. We hope you enjoy our costume!

Supplies
- red dress (we ordered ours from Victoria’s Secret (they have lots to pick from)
- blue fur (we picked ours up at Wal Mart (it was originally a rug, but you can also find this fur are most craft or fabric stores too)
- red tights
- red shoes
- hair elastic and clips
- optional: red ribbon, Thing 1 and Thing 2 key chains, red yarn for a necklace, false lashes
- needle and thread
- iron
- t-shirt transfer paper (for dark fabric (otherwise it won’t show up)
- glue gun
Making the Dress

1. Cut the blue fur into one long thin strip, which will attach to the top of the dress. The width will be no more than 2 inches and the length will be a bit longer than the total opening of the top of the dress. Hand stitch or use a sewing machine to attach the fur to the top of the dress.

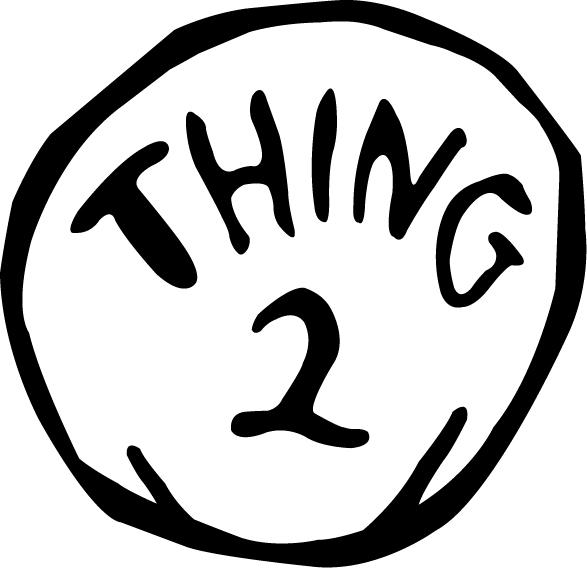
2. Use the above templates to print out a large image of both “Thing 1” and “Thing 2” logos on separate T-shirt transfer paper. We bought our paper from Staples, but any office or craft store will sell these sheets. Once they are printed, cut out the circular shape and iron on to the stomach of your dress. (Make sure to follow the instructions provided in the box so that you don’t iron your logo on backwards!)
Making the Boot Covers

3. Cut out two thick strips of blue fur, about 15 inches in length. Once they are cut, place the fabric around your leg (where you would be wearing them) and pin them to the right size. Err on the snug size so that they don’t fall down! For each boot cover, sew the smaller ends together to create a complete circle.
Making the Hair Pieces

4. Cut out small pieces of blue fur (about 8-10 pieces). These should be about 1″ thick and 6″ long. Tie the pieces of fur in a knot around a hair elastic. We did our hair half up and then tied the hair elastic around the half section of hair.

5. Cut out 2″ pieces of fur to glue gun to extra hair barrettes. We used these to place around the crown of our heads to make the fur stand out more.
Optional Additions

Necklace: Use an old Thing 1 and Thing 2 keychain, or print out a picture of your favorite Cat in the Hat character. Cut them out to size and string through a piece of red yarn.

Purse: Cut out a circular piece of fur, about 15″ in diameter. Cut eight 1″ slits around the outside of the circle. Thread a piece of ribbon through the slits TWICE. Start from the inside and weave the ribbon in and out of the slits until you reach the beginning again. When you reach the beginning again, glue the ends together with a glue gun. Pull on one layer of the ribbon on opposite sides to make handles. The purse will open and close by pulling on the ribbon. We had extra Thing 1 and Thing 2 key chains, so we attached them to the side!

Makeup: We added bold top and bottom fake lashes for extra effect!
Finally…

Here we are out celebrating Halloween with our other sister who made a cute Cheshire Cat costume!
Have fun and happy Halloween!
Are you going to give this costume a try? What’s the best couples costumes you’ve ever seen (or been)?
xoxo
Megan
You might also like…
Halloween: 6 Clever Costume Ideas
Tuesday Ten: Pretty Pumpkin Ideas
Halloween DIY: 50 Shades of Grey Costume
Halloween DIY: Jack-in-the-Box Costume
